Thursday, October 28, 2010

Small visitors

I have trained my nephew, when he enters the shed, to proclaim: "wow, it's big in here!" 


It is inexplicably satisfying to remove the forms from around a concrete pour. It turned out great! And now it's a great work bench while construction continues:


 I am really starting to like the aesthetic of tar paper and firring strips. The contrast is great, and there is something very transparent about it. I am almost questioning whether the cob + earthen plaster will look as good when it's done...


 Little by little, I've been nailing metal fencing to the sides of the building, spaced about an inch away from the wall. This is the framework onto which the cob will hold.


 There are a lot of custom cuts to make it fit right...


Here is a void that I want to fill with cob, as an extension of the wall - for more oven protection.

Tuesday, October 26, 2010

Concrete Countertop

The title is a bit misleading, as I wouldn't call this a true concrete countertop experience.  Most of the concrete will be covered by an earthen pizza oven, and the rest of it will just be left rough - no finishing with stains or sealants. 

I had a lot of fun designing the form for the concrete pour. The shape includes a hexagonal-ish extension, onto which the circular cob oven will sit.


I tied all of the rebar together with metal wire, and then raised the rebar up 2 inches using pieces of rubble:


After the pour:


The countertop extends past the sheathing and into the building, where it rests a lot of its weight on the floor joists. Here you can see it inside:


I had some leftover concrete, so I built a quick 8X8 box into which to pour. It will be a neat little block to use somewhere later on.


I am wrapping the house in tar paper, and then attaching metal mesh to provide an attachment point for a 2-3 inch layer of cob. The entire building will get this treatment, and then be covered with cob; a beautiful earthen plaster will be applied once the cob is dry. The tar paper is to avoid any problems with the cob drying out/ruining/warping the thin plywood (which I don't think will happen, but I can't afford to find out).


The combination of tar paper, firring strips, and the setting sun make the building appear very skeletal:


Losing small tools, like drill and driver bits, is inexcusable. The six dollars that I spent on this case provided me with six dollars worth of joy within hours of using it! After having spent almost two years building with as few tools as possible, I find myself in a good position to now select what is truly worth having, and what is extraneous.


Saturday, October 23, 2010

Plaster Progress

What an afternoon at Eno Commons!

I was sitting in the sun, drinking a beverage, just looking at the house, soaking it all in. And my eye swam over to this one particular rock in the foundation that I really like. Can you guess? It's the one second from the top in the middle, that hangs its little tail flap over the rock below it. Ahhh, the little details....

Throwing up a rough plaster over the strawbales, which will dry and crack and provide a more stable layer for the final plaster on Sunday.

Mia closing the door for this photo. It's neat how you can see the shape of the strawbales through our plaster. This was about 10 minutes after we finished plastering. The bales steal the water from that plaster really quickly!

It's amazing how many trees surround the house in such close proximity. These four trunks are less than a foot away from the roof perimeter, and there are plenty more on the other three sides of the cottage. There is one in the front of the house that is within 2 mm of the roof fascia boards. This is something you'd be hard-pressed to find at a conventional building site. These dozens of trees would have been felled long ago.

Morning with the shed.

I had a brainstorm last night about what to do with the five 2-foot pieces of metal roofing that I had leftover from installing the main roof on the shed (the sheets were sold in 8-foot lengths, and the short side of the gable roof is only 6-feet long, so I cut them). My eye really likes the look of cascading, complex, multi-planar roofs, so why not add a tiny little thought of a roof on the south side of the shed? Functionality, this will provide additional weather protection for the earthen oven, rain protection for the plaster on the bottom half of the south wall (as the main roof overhang is only 6 inches), and a nice little place to potentially hang some garden tools.

So before heading over to the cob house for most of the day, I spent the morning like this:


Thursday, October 21, 2010

Materials

Having posted about the shed last night, and now the cob house tonight, I find myself wanting opinions from other humans about whether both structures are beautiful (so please comment). The cob embodies so much of one particular feeling, and I find the shed to appear a bit less alive, but still so fun to build and beautiful in its functionality.

Look at the two:


I'm tempted to think that the cob house is a structure that can stand alone as a whole accomplishment and a finished sculpture that is a very real part of all the artists/builders involved in its making. In contrast, the more conventional shed is a representation of the piecing together of very processed materials that aren't - and can never be - "mine." As a result, the shed will never be my own creation, regardless of how unique the design details are to my brain.

I was thinking about this the other day when working on the cob house. The ladies who I am building it for will most likely refer to it as "our healing room," when introducing it to people in the future. They paid me to build it. Much like I pay for things, and then they are mine; my truck, my clothes, my tools. Now I am thinking that they aren't mine. If I wore carefully crafted clothes from a local seamstress, than my clothes would be hers or his. As it stands, I don't know who or what made my clothes, and so they are no ones. In any case, I think this is one way in which money is (dangerously) powerful. It allows me to claim ownership of things that I did not have a hand or brain in creating.

This brings me to the dilemma of using processed materials. Cob is processed by me, and very little. Milled lumber is processed by a whole host of other machines and people, and quite a bit. I imagine that I'd have the same disconnect with the cob house as I do with the shed if I bought all of my cob at Home Depot, and it had already been mined, transported, mixed, and transported again by machines.

I love both structures, but the struggle persists.

Finishing what was started

**As a disclaimer, I'm not sure why my photos are not able to be clicked and enlarged. I'll look into it. I'm also not sure why some of my text is loading in black, when it should all be white...**

On days when I am not working on the shed, I have been over at the Eno Commons Co-Housing community finishing up the cob healing room that I started earlier this year. It had a sizzling hot, dry summer during which to dry, and is looking great!

Last week I got back into some foot-mixing to fill in some gaps that I ran out of time to fill in June. I also hung a bright green door at the entrance. On Saturday, we hosted a plaster party, to which a number of adults and kids from the community attended. Our team got a great start on coating the interior with earthen plaster, and then I spent the following two nights troweling on a finish coat. I wanted to work at night so that I could spend my daylight at the shed. I found working by a lamp, in a cob building, in the woods, at night, with a boom box and some solitude to be very meditative and relaxing. I became acutely aware of how incredible a structure it is.

The plaster is still drying (and lightening in color), but here's what it looks like as of today:


I'm not sure if I like the exposed stone as we did it, but it's definitely interesting. It was supposed to be a big, tall, beautiful stone column, but we ran out of stone a lot faster than we had anticipated. To make it seem more like it makes sense, I think I'm going to clean the stone, go over the mortar with a dark acrylic paint (I've heard that this is a good way to achieve a nice contrast between stone and mortar, which is what we need here), and maybe do some decorative white lime plaster around the outside border of the stones to set it off as it's own element.


(The mudroom still needs to be plastered. I ran out of the one color of clay, and so the mudroom is going to be a darker shade of red, as is the exterior of the building)

This color, in fact:


Just imagine covering the entire exterior of the building with the clay in the barrel. It's going to be quite a beacon in the woods! And a great compliment to the green door.


One thing I love about working in the forest (as opposed to my first cob cottage which was in the middle of an open meadow) is the quality of the light and how it plays on the material. It makes it tough to capture a clear photograph, but I enjoy the complexity of these exterior shots anyhow:


I have to think that I have never stood in the spot before until I took the photograph below, because the house looks so loooooong! Longer than it is. I like ladders.


And to finish, I want to give Elizabeth proper credit for her work in picking apart clumps of horse manure. This processed manure is what we use in the earthen plasters to act as tensile strength (an equivalent to the straw in cob, but much finer and less visible). These are her hands, doing the good work:


Wednesday, October 20, 2010

New Project

After spending a delightful and tasty summer working at Stony Creek Farm in upstate NY, I am glad to be back in Durham to start a new building. The next project is a big one, both in terms of size and time-frame. I have been designing and am going to start building a cozy winter cottage for my parents (with the intention of it eventually becoming their full-time residence). I'm hoping to spend the majority of the next year working on it, allowing myself plenty of time to focus on customization, details, and craft.

One exciting aspect of this project is that it is very urban; very exposed. I am building at 606 Carlton Avenue, which is just a couple blocks from the main library, and less than a mile from city center. I expect that more people will see this cottage in the first year than will see my other cob structures throughout their lifetimes. This means, among other things, that I will need to get a permit.

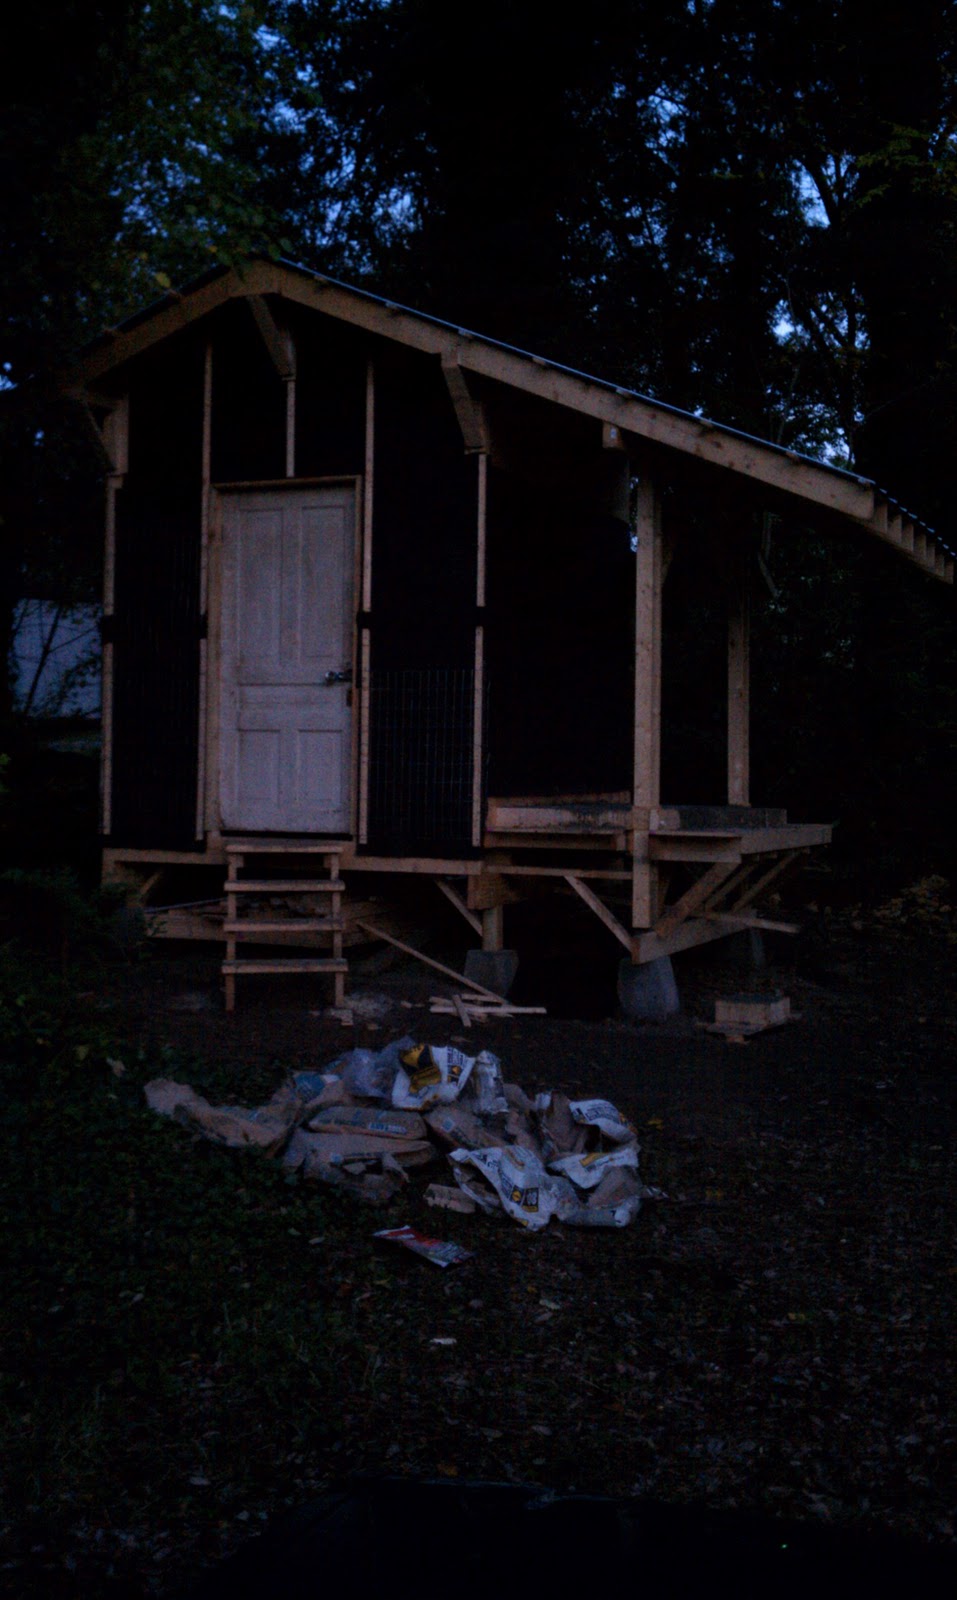
For starters, I decided to build a tool shed. To me, it seems logical to build a shed first, and a house second. This way, I have a safe, dry place to store my tools while I build. The city sees it differently. I tried to get a permit for the shed, but found out that one is not technically allowed to build a shed on a property that doesn't have a dwelling on it. But here it is anyways:


You can see that the roof on one side is extended about 7 feet past the edge of the building. I plan to pour a concrete countertop under this overhang - upon which I will build a cob pizza/bread oven, with the hopes of hosting a neighborhood pizza party in the next month.


Here are the poured concrete piers that I began with:


I built the forms so that they would taper slightly from bottom to top - both to provide a wide, solid footing as well as a nice aesthetic. They are held together with screws, so I was able to unscrew them after the concrete began to cure, take them off, re-build them, and then re-use them.


Now the piers are all cured up and hard as rock*. Having the shed raised up on these stilts gives it an elegant look, and provides a good amount of dry storage space underneath it for materials.

*(at Cob Cottage, I was taught that using concrete was a sin. For a while, I believed this. But while I still think that it is vastly overused in today's building world, I also think that it is a brilliant material when used sparingly. Free-form stone! I took the liberty of using it for this application because there is no stone on the property.)


A bad photo of the inside...
I just today got a lock on the door, and so began to move my tools in. I plan to design a proper system of hooks and shelves for hanging/storing tools and materials. Right now it's a mess. You can get an idea from the photo that there is a good-sized storage loft.


I had fun building the steps, and deciding to install them at a 30-degree angle to the house. I think it flows a lot better with the natural path than if I had installed them perpendicularly.


I framed out some trapezoids, within which I hope to make windows:


Here they are installed up in the loft. You can also see the little rectangle I framed out under the overhang, which will function as ventilation once there is a screen over it to keep bugs out.


I have been using Google Sketchup (a really intuitive, free computer program) to design both the shed and house:


The potential layout of the main house...


...and a rough idea of what it might look like from the outside:


Why so much carpentry? And power tools? And Home Depot? What about cob?

- I like carpentry.
- I try to take a healthy dose of hand tools for every time I use power tools, but they prove very useful in many cases. My arm can only do some much sawing in one day.
- Home Depot is a place I would like to phase out - I'm still trying to find other material sources that are more friendly and knowledgeable like Public Hardware (Durham's oldest hardware store!), and Talbert Building Materials. With all of the houses being flipped around here, I'm also trying to seek out opportunities to repurpose old materials that would otherwise go to the dump (and are free).
- And there will be plenty of cob! The basic plan is for the load-bearing structure of the house to be post-and-beam framing (like a barn). Big, heavy timbers. The infill between the posts will be plastered strawbales around the outside envelope of the house (for good insulation). This leaves all of the interior walls to be cob, where it can soak up passive solar heat as well as any heat being created in the house, and store it like a battery. It will also allow an otherwise very rectangle house to feel as much like a free-form cave as I want it to.