Tuesday, July 3, 2012

7-Day Cob Workshop!

A couple of weeks ago, Mike and I ran a workshop here in my backyard in Durham. It was a great success! We hadn't run one since 2009, and weren't sure how the urban setting was going to work out, in regards to fostering the right atmosphere for a cob workshop (comfortable, peaceful, inspiring, beautiful, etc...). 

 We had 3 people camping in the backyard, which made for a very real and enjoyable sense of community through the mornings and into the evenings. The rest of the students commuted each day. The mix of people was wonderful. A good balance of older and younger, male and female, artist and computer geek. 

 Our chef, Julia, cooked all of our meals here from scratch, using fresh produce from the Circle Acres organic farm in Chatham County. Food can make or break a workshop, I think. As peaceful as we try to keep things, we also try to fit as much as we can into the 7 days, and so everyone ends up pretty exhausted each day. Good food makes this okay. 

 The building we worked on does not yet have a definite function. It could be a meditation room, a bath house, an artist studio, or a whole host of other things. I can see it as a functioning outdoor kitchen, or a space within which to build a ferro-cement swimming pool, or a tool shed (but we already have enough of these), or a sleeping hut (but we already have one of these, too). It could be a playhouse, certainly. I will figure this out with my parents, who will be visiting soon.

Photos...


Here is our fire circle area, around which we shared meals and building discussions. Campfires happened each night, as well.


The panes of decorative, privacy glass have been sitting around for a year now. I picked them up at the curb downtown last year, knowing that they would be perfect for something. We had the building lit up with candles one night, and it looked incredible to see the candlelight through the glass. During the day, these windows let a nice quality of light in, without the harshness that can sometimes accompany direct sunlight (they are positioned on the south side).


Leo enjoyed spending some time with Salame, a 15-month-old girl who participated some of the days with her parents, Jeff and Faye. Cob is very kid-friendly. Safe, non-toxic, and requires few tools other than your body.


Having a "cob toss" is a great way to get material from the mixing site to the building. Everyone lines up, and balls of the cob mixture are thrown one at a time down the line. Here is a unique photo that Danielle captures of our synchronization. I guess it's obvious that Mike and I have been building together for 4 years now.


View from the porch of the house:


Getting everyone up on scaffolding, as the walls grow.


We built strawbales into the west wall, as a demonstration for interested students. "Balecob" is a great method for utilizing the two materials in harmony and combining their respective thermal properties in an elegant, clever manner (bales on the exterior, and a thin cob wall inside of them).


The tiny carrot-sized cobs that make up a cob arch are strapped back over one another to create a "muscle" and/or "beak" of cob. The arch is built over a period of 3 or 4 days so that it can dry out slightly at different stages. Trying to build it up all at once would result in it toppling over from too much weight overhanging open space. 

If you look through the arch, you can see Leo asleep on my back. I realized after a couple days that I could get him to fall asleep every time I mixed cob, without fail (assuming he was sleepy)! He is not an easy guy to get to sleep, but the "dancing" that is required for each mixing must have soothed him into dreams. He would continue to sleep on me as I built, for hours sometimes. This reinforces my belief that babies are meant to be with you as you do your daily work.


Here, Nathan is experimenting with using black topsoil as a binder in an earthen plaster (instead of clay soil). I never would have thought to do this, because natural building convention is to keep organic out of your buildings and in your garden. It seemed to work fine, thought! Maybe it had more clay in it than we thought. And a beautiful, rich color. Workshoppers always come up with new ideas that I would never think of alone - that's one of the greatest things about a workshop - it's an incubator for new, inspired ideas.


On the final day of the workshop, we set a roundwood ridge beam on top of the walls. It is maple, and had been harvested days before from the farm in Chatham County. It was a meaningful way to end the week.


The experience was incredible for me. It's amazing to watch people become empowered with the simplicity of cob. After 7 days of building, students were itching to get to their land and start building their house. One of our graduates is already in Tennesee building. And Jeff and Faye are moving to Idaho by the end of the year to build their cob home. 

I was impressed by how much building we got done in just 7 days! Thanks to all who participated, and to Danielle and Leo for taking the photos.

Root Cellar Progress

The cob house is finally finished, and being used daily by Anatoly as his office. The photo below is the best I have of what all of the different elements look like together. The floor turned out really well! We used a purple clay and a Spanish red pigment to create a deep purple finish floor mix. Then we saturated the earthen floor with coats of linseed oil, and finished it with a beeswax polish. It feels very cool to the touch, which is refreshing for bare feet in a scorching Carolina summer.


A charming look at the North side of the building:


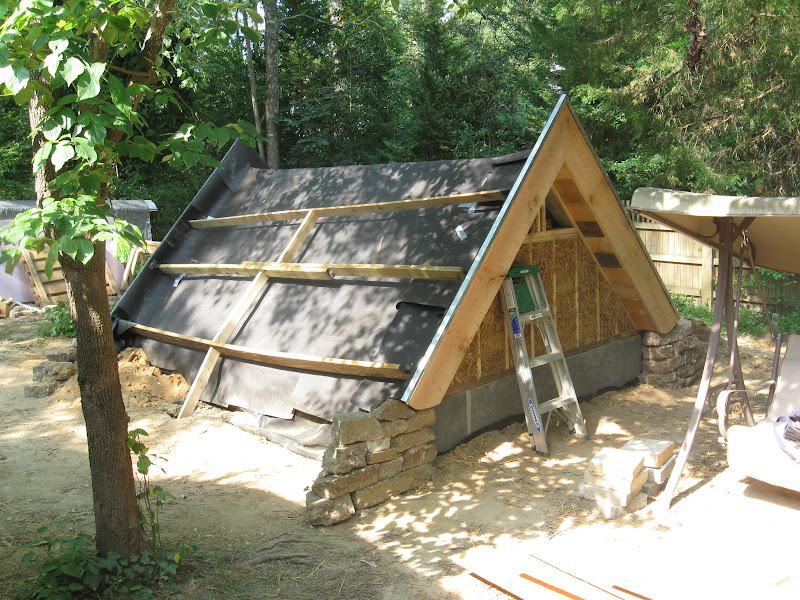
We have been working this past week on the root cellar that is tucked back behind the cob house. You can see it below, looking like a wooden pup tent:


So far we have spent 11 days on the root cellar, broken up over a 2-month period. About a month ago, we poured the concrete floor, shown below:


We sourced oak timbers (4"x8") from a local sawmill, and created a sturdy roof system - strong enough to support the weight of the 12"-thick layer of soil and plants that will ultimately sit atop the root cellar.


Notice the detail below of how the rafters are notched so that they are butting up against the concrete foundation wall in addition to the sill plate. The concrete would have to bust for the building to collapse (making this structure appropriate as a bomb shelter).


From the same sawmill, we bought a whole bunch of pine decking boards, and created the roof deck on top of the oak rafters. The wood is rough-cut lumber, meaning that it has been logged from a forest, and then sawn into lumber at the sawmill. That's it. It hasn't been planed (to make it smooth and even), nor has it been dried in a kiln. This is the difference between rough lumber and the stuff you'd buy at Home Depot. Less processing. It looks a lot more rustic, is (arguably) more fun to work with, and costs less. It's one of the few instances in which you can buy a more local, more natural, more beautiful version of a product and actually have it cost less.


Installing the fascia boards, which will prevent the "living layer" (soil/plants) from falling off the edge of the roof.


The gable end walls (the framed triangle at each end) were insulated with "light straw-clay" insulation. This is simply loose straw that has been lightly coated with clay slip (which is clay soaked in water). Here Mike is mixing the material by hand - tossing it like a salad.


Here is some quick, messy form-work within which we tamped the straw-clay material. These boards are only up for an hour or two. The straw-clay is tamped in between the studs with a 2X4, being compressed as much as possible...


Then after an hour of drying time, the boards are removed to showcase the newly-insulated walls. It's amazing how stiff the material gets so quickly. Just straw, clay, and water. Cheap, easy, and relatively quick. Once it dries, it can be plastered directly over with a clay or lime plaster (we will do lime).


I did some dry-stacking today at each corner of the building to create mini-retaining walls to act as an extension of the fascia, in an effort to contain all the soil that will rise over the building.


The criss-crossing boards that you see running over the tar paper are going to get covered up with soil. They are just functioning to provide some support for the soil until plants take root. Once root systems grow, the soil won't want to go anywhere, but for the first couple months, the loose soil might be tempted to slide off without these supports.

The whole roof at this point has been covered carefully with two layers of tar paper, then two layers of 6 mil polyethylene plastic, and then another layer of tar paper (as a protective barrier over the plastic).


Next we are building shelves inside, installing a door, installing a vent, and covering the thing with soil! And planting seeds on top, of course. The final thing we will do is plaster the gable end walls, once the straw-clay is totally dry (to avoid any potential mold issues).

Sunday, May 27, 2012

Through the roots, for the roots.

We have finally begun work on the root cellar in Anatoly's backyard! Right next to the cob sleeping cottage. We already had a big hole from mining clay for the cob house (the hole was the inspiration for the root cellar, in fact). Here is Mike beginning to persuade the hole into a more defined shape...


This is the drainage "bulb" at the end of the tail trench. This provides an exit path for any water that collects under or around the root cellar. This bulb will be filled with gravel and then covered up with soil. You won't ever see it once the grass takes over, but it will be underground performing very important work. Without drainage, there would be serious water issues inside the root cellar, namely standing water and dampness.


Our client decided that he wanted a poured concrete foundation (versus concrete block, or wooden posts, or other options...), so we began to make forms. You can see in the photo below that we lined up pieces of broken concrete around the perimeter of the pad. These act as a "footing," which spreads out the weight of a heavy concrete foundation, like the one we'll be pouring. The footing is usually poured out of concrete, too, but a neighbor was getting rid of these concrete chunks and so we saw an obvious opportunity for reuse!


Here is the form before bracing.


Rebar hanging in the form. It will provide tensile strength in the concrete, when the concrete dries around it. It's like the straw in cob.


And here is the form all braced and ready to handle the weight of wet concrete!


We ended up designing the form so that we would have a floor system, on which to lay some plywood, so that we could roll our wheelbarrows of concrete up on top of the form, and pour from the middle (instead of having to make dozens of ramps on all sides).


The floor worked great.


Mike trowels the top of the wall, to get it as smooth and level as possible.


Here I am removing the forms with a sledge hammer, the following day. Forms can be difficult to remove, because the weight of the concrete squeezes everything together tightly. But despite having the bash things apart, all of the forms are mostly intact, and ready to be used again for another project.


The finished foundation wall!


Sunday, May 13, 2012

Carlton Screen Porch

Squash flowers! Danielle is trying a zucchini-staking method that she read about on a square-foot gardening website. We're trying to pack as much as we can into our small beds.


I've been doing a lot of work on the back deck, to convert it into a screened-in porch. The original plan was to have just a deck, and then we decided to put a roof on it, and now we have decided to screen it in. Needless to say, it isn't the easiest thing to screen in, with all of the angled shapes and big beams to work around. If I could have predicted that it would be a screen porch, I would have constructed it differently. However, it has quite a bit of character now. We've gotten really good feedback about it thus far. Cob and earthen plaster have come in very handy in filling the odd spaces.


The three main openings are tempered glass, that I ordered from a local glass shop. There is also a trapezoid of glass above the yellow door. Other than that, everything else is screen. The glass was strategically placed in areas where the most weather had been coming onto the deck. Now it stays very dry in the rain, even with all of the screens.


I had to come up with a clever way to screen in the top of the space. It would have been too complicated to screen between all of the rafters, and in all of the gabs between the plastic roofing and the purlins... too many complex cuts to make. Instead, I made these screens that screw up along the bottom of the rafters. They are removable for any cleaning/repairing purposes.


Here you can see Mike up on the roof, applying the finish lime plaster to the exterior of the building.


I applied lime to the street-side, above the red siding. It looks brown in this photo, but has since cured/dried to an off-white color.


You can see it drying here, looking mottled (I really like this look, I wish it stayed this way):


We also applied lime around the porch, so it now looks neat and clean.


This is closer to the finish color, but will still get whiter.


I installed a nice hanging light in the porch, so that we can get a table out there and have nice evening meals. I am trying to buy only lamps that direct light down, where you actually need it - not lamps that send light up into the sky, where it just becomes light pollution.


I had to dig into the wall to add on another switch for the new light.


There was already a switch on the opposite side of the wall (on the interior), and so I connected into it. Now you can turn on/off the porch light from inside or outside the door.


It used to be intimidating, but now I really enjoy cutting through the walls of the house. It's so interesting to think through how to adjust something without create a lot of damage and repair work.


Now I will have to re-plaster around the new switch, which won't take long.


I also added this motion-sensor light near the door, to welcome one home at night.