Friday, January 3, 2014

Mud Dauber School of Natural Building!


I am excited to announce the posting of the first workshop opportunity at the Mud Dauber School of Natural Building! At this point, the school is still very much in-the-works, and the first workshops will be geared towards creating infrastructure for future workshops/apprenticeships/events/visitors.

I have had the desire to have a school of natural building ever since apprenticing at the Cob Cottage Company in 2008. It was a very empowering and inspiring experience, and led me into a path that I have thoroughly enjoyed. Now I have a family to share this experience with. Danielle took one of my workshops, then ran her own, and designed and built her own hand-sculpted cob cottage. Leo is our little two-year-old boy who loves to be outdoors, and has a wonderful understanding of natural building for someone so little.

If you look back through some of the more recent posts, you will find images of the house that I am building for our family, which will share the same land as the building school. It will soon be time to start stacking strawbales against the wooden framework! It is a permitted building, and will include cob, natural plasters, some earthen floors, and rough-sawn siding from the local mill, in addition to the strawbale walls. Our aim is to offer hands-on workshops about permitted natural building in addition to our standard cob workshops. Once we develop our infrastructure further, we are excited to begin brainstorming about wonderful workshop offerings designed specifically for children and families, too.

I am very inspired by the DIY-spirit of people I meet through natural building, whether it is building a home, a tool, a piece of art, or something else. I look forward to finishing our strawbale home, moving fully to our peaceful country spot, and beginning to really focus on hosting workshops and helping spread natural building to the east coast.

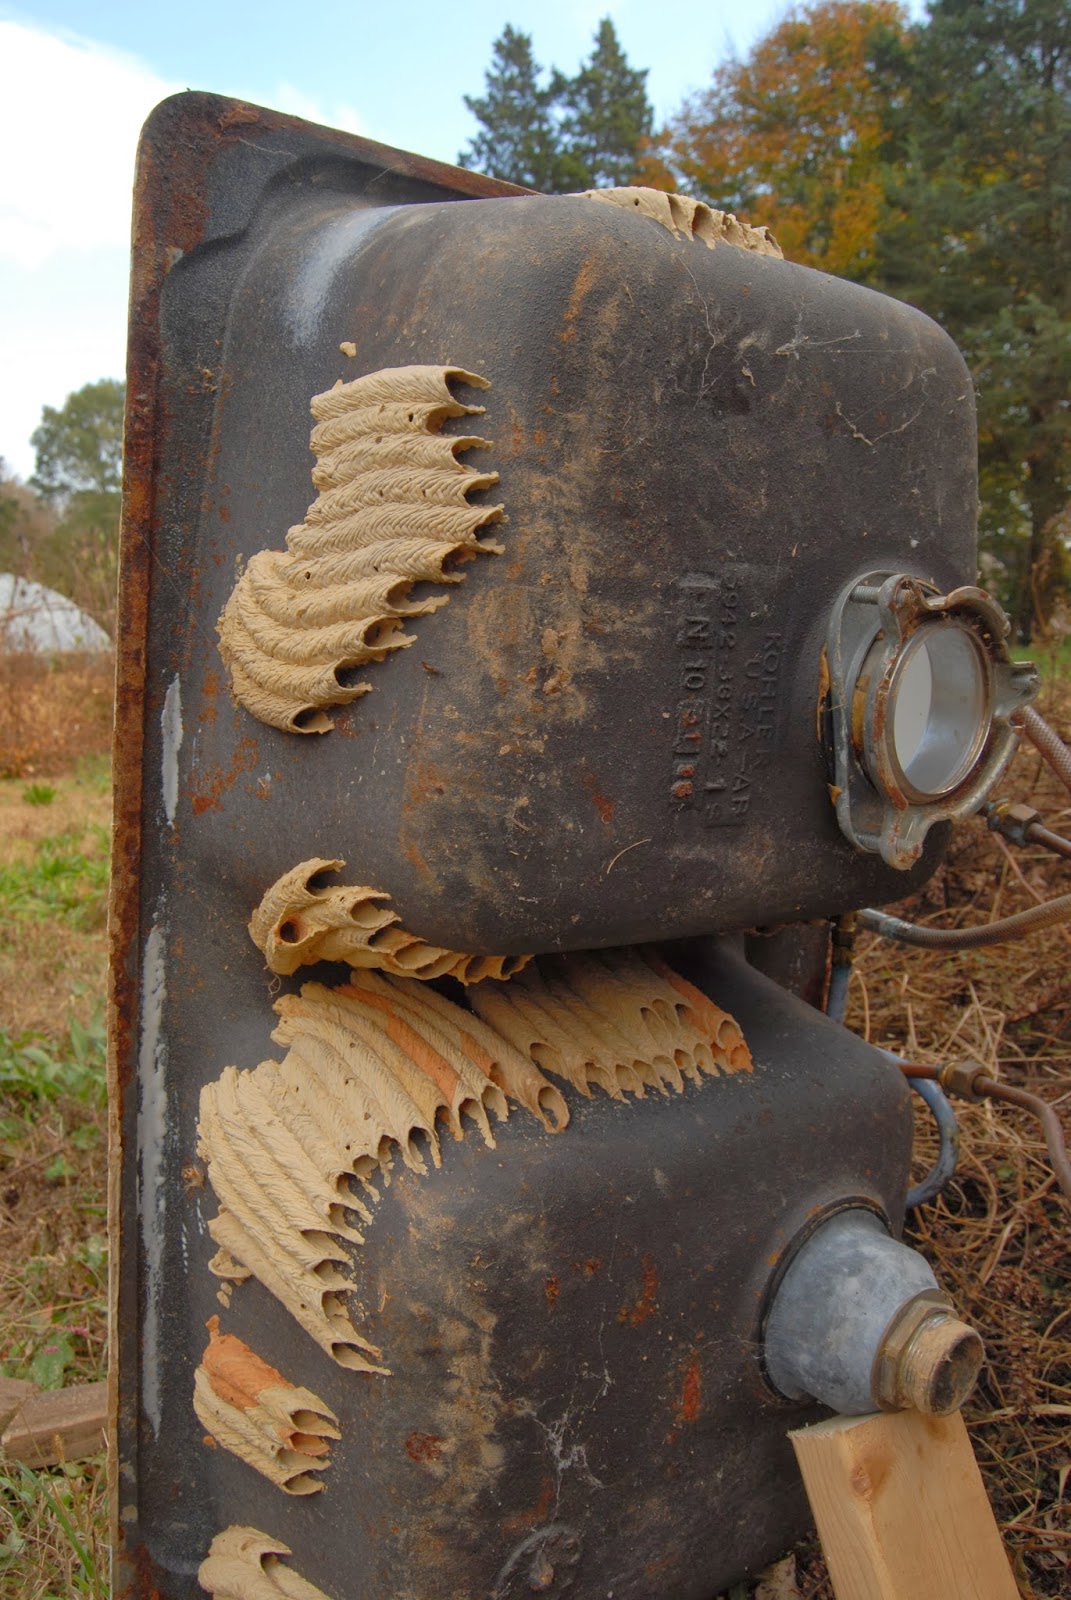
It took us quite a while to arrive at a school name that we both felt really good about. After much searching, I looked to the work of my companion natural builders, the organ-pipe mud dauber wasps of this area. They have collaborated on all of my cob projects with me (when I'm not around, typically), leaving the most beautiful clay nests in various places. The wasps are not aggressive towards humans at all. They use all different colors of clay, and combine them in really beautiful combinations; the shapes, siting, and layering of the nests is just incredible! I hope to have their old nests in all of our buildings.


Tuesday, November 5, 2013

Plastering...


Mixing up some earthen plaster to fill in some low spots inside.


 Time for the scratch coat of lime plaster.


This was tile that Danielle had embedded in the lime plaster on a windowsill of the original cob house. That window bay was removed to accommodate the addition, and so the tile has been sitting around the site, wanting to be used.


Finish coat of lime over the scratch coat...


Saturday, November 2, 2013

WInter Home

Soon, my parents will be back in town, and it will be time for us to move out of their Durham home. And since our new strawbale home is not even close to being completed, we decided that Danielle's cob home would be the best spot to inhabit for the winter. This means finishing the interior, of course! So I have been working for the past week on preparing the cob house for our stay.

The structural cob is complete, but there was plenty of sculptural cob to be mixed. The weather has been very pleasant, and accommodating for bare feet. Leo was excited to get in on the foot-mixing, along with me and our friend Gray.


One of the first things I worked on finishing was the little gable roof on the east side. It has been sitting for a year and a half without any tar paper or metal. I had enough metal scrap laying around from the other house to use for this small job.


The next big project was pouring the earthen subfloor for what will be the living room. I foot-mixed a 1:3 (clay:sand) subfloor material, and troweled it out on top of the gravel drainage layer (with some old lumber tarps in between to prevent the floor mix from falling into the spaces between gravel).


One of the local cats was excited to celebrate the new subfloor with his tracks - these will get covered by the finish floor layer.


I installed some built-in shelving near the sink area. I think our plates and cups will reside here. I was able to pick a lot of great lumber from the free scrap pile at the sawmill nearby, and make a lot of great shelving from it - pine, cedar, oak, other hardwoods... I can't believe it's free!


Old hardware from the shop of a father of a friend of Danielle's mom's, that will be put to good use in our new kitchen.


This is the wood stove that we originally bought for our strawbale house, but decided would be more appropriate here because of it's small size. It draws really well, and is a pleasure to use. I look forward to wood heat this winter!


I began working on countertops the other day: tile around the sink, salvaged chestnut for the main preparation counter...


The chestnut still needs to be finished with a butcher block finish, and then it will really sing!


I loved seeing the mud dauber wasp nests that were built with cob around the basin of the sink. It's such intricate, incredible artwork.


Leo and I built a little cob bench together, so that we have a place to sit and take winter boots off when we come in the back door. Here he practices his troweling on the bench:


Danielle took some great shots of and from the green roof. Things are very much alive up there - it's exciting to see the growth! All I did was throw soil up - no watering, no planting, no maintenance.


This is a shot from the upper roof (the original roof). You can hardly tell that you're looking down to the ground past two roof tops. It looks more like Danielle is sitting up on a hill. Can you spot the edges of the two green roofs that are in the photo?


And here are some other photos of the house from all kinds of perspectives:


While I was in the country, I also took the opportunity to built a quick little pump house for our new well (to keep the pressure tank from freezing). The blue foam is free from a friend who was taking down chicken houses. And the door is made of some more of that great free lumber from the sawmill - some really wide hardwood boards - so simple and beautiful!


Eventually, this building will have wooden siding, but for now I just wanted to make it frost-proof.


Saturday, September 7, 2013

Making Home

I have been fully enjoying my time building a home for my family. Danielle and I worked out the design for quite a while. "Version 1" came while we were visiting Stony Creek Farm in Walton, NY last November, and was clearly inspired by Dan and Kate's 900-square-foot cabin (thanks for the inspiration!). Over 6 months, our original idea was constantly tweaked and improved to fit our needs. I love designing spaces, and to spend time designing my own space was a treat that I have looked forward to since first learning how to build.

We bought our land in March, and began dreaming all over it. We had a driveway cut into it - and a house site cleared while the big excavator was around. Having trees cleared for out home felt selfish and I remember feeling physically disgusting when I first pulled up and the contractor had already started swinging his huge boom around, knocking trees down and ripping them up out of the earth. One of the considerations for our house was a desire to damage ecology as little as possible. Thankfully, all of the trees that ended up coming out were less than 10 years old (most of the land had been logged 8 years back). 

Once the site was clear, the builder in me wanted to take over the reigns from the designer. After a couple more big design changes, I submitted the plans for a permit, and started groundbreaking within a week of receiving it.

Mostly, I've been working alone. I've had Mike's help on Saturdays, which has been great. I had a fun painting session with my father, danielle, and Leo one day. And our friends Gray and Ben have both been out to help a couple times. Thanks to all! Here is what has happened:

There are big concrete "footings" below ground level that I dug the holes for, and then had a concrete truck come to pour. What you see in the photo are the piers that I then poured on top of the footing, in these home-made forms.


The piers will hold the house up off the ground, and the footings below them will spread the weight of the house out across the subsoil. I kept spraying the concrete for a first day to prevent it from curing too quickly in the heat.


I find great beauty in a well-stacked pile of lumber. This is some rough-cut pine that I had sawn at the local sawmill down the road. It will be our house's siding some day.


I started to construct the floor system one piece at a time, leveling each part as I went.


The piers are all the same size, and the ground slopes, so I used wooden "stilts" of varying lengths to level everything out.


You can see here how each stilt is notched to allow the beam to sit on it.


Getting somewhere....


All the floor joists are in! Time for the subfloor.


Half of wall #1! Some of the walls are very tall, because they extend into the second story. I built them all lying flat on the subfloor, and then lifted them up as whole units, so in some places I had to do half the wall at a time in order to be able to lift them up alone.


It was very exciting to start putting up the second floor joists. I'm looking forward to having a two-story house. I like the idea of looking onto the pond and garden from high windows.


I really delighted in designing and building the stairs! It was just the right amount of challenge, without getting too frustrating. These are just the basic skeleton for the steps, and nearer to the end of the project I will put the finished treads on and trim them out.


The house starting feeling really tall once we got these posts up and braced and it was time to lift the big triple-2x12 ridge beam up!


The bathtub will be where the little ladder is. The view from the tub will be down to the pond. I imagine taking a hot bath in the winter and watching Leo ice skating on the frozen pond.


I was out there today starting to get some roof decking up. After decking is tar paper, then purlins, then the metal roofing!


Here's the view of the house from down in the garden/pond area.


Getting the roof on is the big push right now (hopefully by the end of next week). Then I can rest easier once I know the rain is not sitting on the floor every time it rains. After roof, the rest of the walls need to be framed out, and then it's time for running the wiring and beginning to install the straw-bales. I need to begin contacting local farmers to find a source of good, tight, dry strawbales.