Wednesday, March 9, 2011

Truck Modification

Despite it already being (arguably) the most useful tool I have for building, I think it's time to modify my pickup to allow for a greater variety of loads. My solution is to add a lumber rack, and a flat deck on top of the bed. There will be a permanent "U" of wood around the edge of the bed that is bolted into the metal (as shown below):


The rack will bolt into the "U" when needed, and will allow me to carry really long items (lumber, rebar, roundwood, PVC, etc...):


The deck will allow me to carry large, flat things without the wheel wells getting in the way (such as 4X8 sheets of anything). The deck will be made up of 3 light-enough-for-one-person-to-maneuver panels that slide on, and lock in place.


The space underneath the deck can be used to transport tools. The idea is that eventually I will put a locking mechanism on the tailgate, and then I can store tools in rubbermaid containers (safe from rain and/or theft) in this space.


The whole setup should be really useful, and can be taken off if ever I need to transport a load of dirt, sand, gravel, etc...


In the next couple days, there should be photos for viewing, if all goes well.

Monday, March 7, 2011

DBDB - Garden Shed, part 2

Dylan and I ventured out again to the land of Ash and Giovanna, to continue work on the shed. Durham Backyard Design/Build has its own blog at this point. To avoid having to blog the same thing twice, I'm just going to post a couple photos here, and link to the other blog, for those who are interested in more detail.


Saturday, March 5, 2011

DBDB - shed design

Here are a couple Sketchup images of the rough design for the shed project that is briefly chronicled two posts previous to this. The power of Sketchup is great - I was able to create this model and series of images in one hour, to show our client.

Door access under the gable to the 6X10 enclosed portion of the structure:


On the opposite side, the roof overhangs 5 feet, and the two side walls continue, creating a protected space to store tools, wheelbarrows, firewood, etc...


The post and floor joist system:


Breaking Ground(level)!

It's a pretty satisfying step after weeks of digging and doing foundation work to finally beginning to work above ground level! I'm right now in the middle of creating the forms for the second (and final, for a good while) big concrete pour. This concrete form will be the foundation stemwall for the house, and will also function to define the crawl space underneath the house, through which I will run plumbing and electric, and store materials.


The form is taking shape:


This whole part of the form won't be taken down after the pour, but will remain as a stud bay into which I will put fiberglass insulation to keep the temperature of the crawl space moderated. I am curious about the potential to circulate air through this crawl space to cool the house in the summer. I must research/think more about this. You can also see the pink foam insulation that I installed around the form. The concrete will rest directly against this insulation.


I taped seams and used spray foam around the edges of the insulation to prevent concrete from pouring out through gaps.


Here's the rebar starting to go in.


At this point, I've completed the rebar, and gotten a whole bunch of the outside part of the form done. The truck is scheduled to arrive on Wednesday to make the pour.

Side Business

Today was a big day for me, as it marked the start of a new business venture. My new housemate, Dylan, and I have embarked upon the classic "weekend business," with a plan to build sheds, fences, chicken coops, playhouses, and studios for people in need of these sorts of things. In regards to my housing switch this past week, it's important to note that Dylan lives in the house right next to my sister, so I still have instant access to my nephew (without any of the guilt associated with being the bum uncle who sleeps on the couch in the home of a nuclear family). Our first project is a garden shed for a young couple, Ash and Giovanna, who live 20 minutes north of Durham and are starting a food forest on Giovanna's family's land. The shed will be a hybrid of conventional materials and very custom, natural elements from the land - cedar posts, stone piers, a cob exterior sheathing coat, and an earthen plaster finish coat.

The initiative for this business came from the thought that all I want to do is build, all day, every day, so I might as well make some money off this desire every once in a while. This doesn't at all mean that I won't continue to enjoy really loose work-trade relationships with my friends - come help me out digging for the day, and I'll come work in your garden for a day next week, and so on, and so forth. That's my preferred way to work. But especially now that I have rent to pay, and want to start a garden, and because I am becoming very interested in expanding my tool collection, I need some expendable income.

The logo is below. We like to say the acronym really fast, because it sounds like one is speaking in an alien tongue.


Here's the truck packed to the gills, mostly with concrete piers. These concrete forms are the same ones that I made for the piers holding up my shed. I've been storing them at the site, waiting for the chance to re-use them. Last night Dylan and I re-built the forms and then poured concrete in the street until 11:00 PM. After that, we talked about game plan, materials list, and so on until after midnight. Then we woke up at 5:30 and headed to our client's site. If there is one thing that has stuck with me from my years in the Syracuse University Industrial Design program,  it is how to devise a painfully hectic and sleep-deprived start to any good project.


It took a good amount of time this morning to excavate for the piers, get them out of the truck (what a trying experience! Each pier in its form is almost 300 pounds), and level them all on the same plane.


This is a capture-the-entire-moment-photo. Dylan is talking to Ash, it looks like. And we have gotten the floor joists in place at this point.


Here are some rocks that we harvested, with help, from the creek bed down the hill. These will be used to create mini-piers under the mid-point of the main runner beams, to cut the 12-foot span in half, and add a nice aesthetic.


While Dylan was at Home Depot for 2 hour this morning picking up the materials (a job I do not envy), I was harvesting a couple cedar trees for our four corner supports. I cut down two trees, and got two appropriate-diameter lengths out of each. These trees were slated to come down anyway to make space for a perimeter deer fence that will be going up soon around their food forest. Look at the gorgeous, Van Gogh-esque patterns on that far post, from all the limbs that were removed! A showpiece, if I ever saw one. Ash and Giovanna shaved the bark off to the level that they liked. It's a gorgeous aesthetic.


Here Dylan is toe-screwing (driving a screw at a diagonal to connect two pieces of lumber) the connection between the top plate (the long piece above his head that connects that top of the studs) and the cedar post. Before the sun went down, we got another wall frame up, as well as a second post at the other end of this top plate, but it was too dark at that point to shoot a good photo.


We expect that the rest of the project up through the cob part could get done tomorrow, if not for the forecast of rain. We were very pleased at how well we were able to stay on schedule. It makes it seem like this business is actually viable as a weekend operation (not every weekend, I don't think), and a source of income that I can feel good about. More photos to come, as things progress...

Sunday, February 27, 2011

Retaining Wall, Revealed.

Here's the footing, peering at it from the East. The little blue foam caps are stuck on the rebar so that people are aware of them and don't accidentally trip/fall.


This is a beautiful sink that was about to be thrown in the dumpster next door. I also collected two stainless steel sinks, but this one is a very heavy ceramic (or cast iron with enamel?), in great condition!


I have hired Dylan to move "urbanite" (broken up chunks of concrete) to my site from down the street. They just recently jackhammered down a 4-foot-high retaining wall two houses down, and so there are a couple big piles of concrete chunks. I'm hoping to make a short, dry-stack retaining wall with this material somewhere in the backyard.


And here's the form beginning to come off of the retaining wall:


This is a spot at which concrete leaked up from the wall's footing, up from behind the form. When I saw this concrete spilling out during the pour, my immediate thought was that the wall had blown out somewhere, and my brain was scrambled to pieces for 10 seconds until I realized that it wasn't a form-break (and consequently not a huge problem).


This is the cavity in which the stairs will eventually go:


A look from down the sidewalk:

Saturday, February 26, 2011

Concrete Pour

A lot has happened since the last post! After having sat in front of the computer for 3 weeks while my finger recovered, I was just itching to get back to the site (and the computer has been terribly unappealing since). Below is an update of the last week and a half of work...


This is what the site looked like during those three long weeks of recovery:


Last Saturday, I was blessed with the presence of my friends Dylan (my sister's neighbor) and Ariel (a student at NC state). We did a pretty good job of transforming the site in the previous photo to the site below. It also took a good chunk of Sunday to finish all the details of the excavation, and get it down far enough below ground level. Dylan and I dug until 11:30 PM on Sunday night, with worklights (and a delivery of pizzas).


This past monday, my first official employee (ever!) showed up. Jeremy will be working with me on most Mondays and Tuesdays over the coming month. He has had a great deal of experience with conventional construction in California, and also has done some strawbale work in Virginia. He convinced me that we should install "batter boards," which is the system of posts and strings that you can see in the photos below:


The whole idea with the system is to locate a level, "square" (meaning perfect 90-degree angles) rectangle. Most people do this before digging the footing trench.


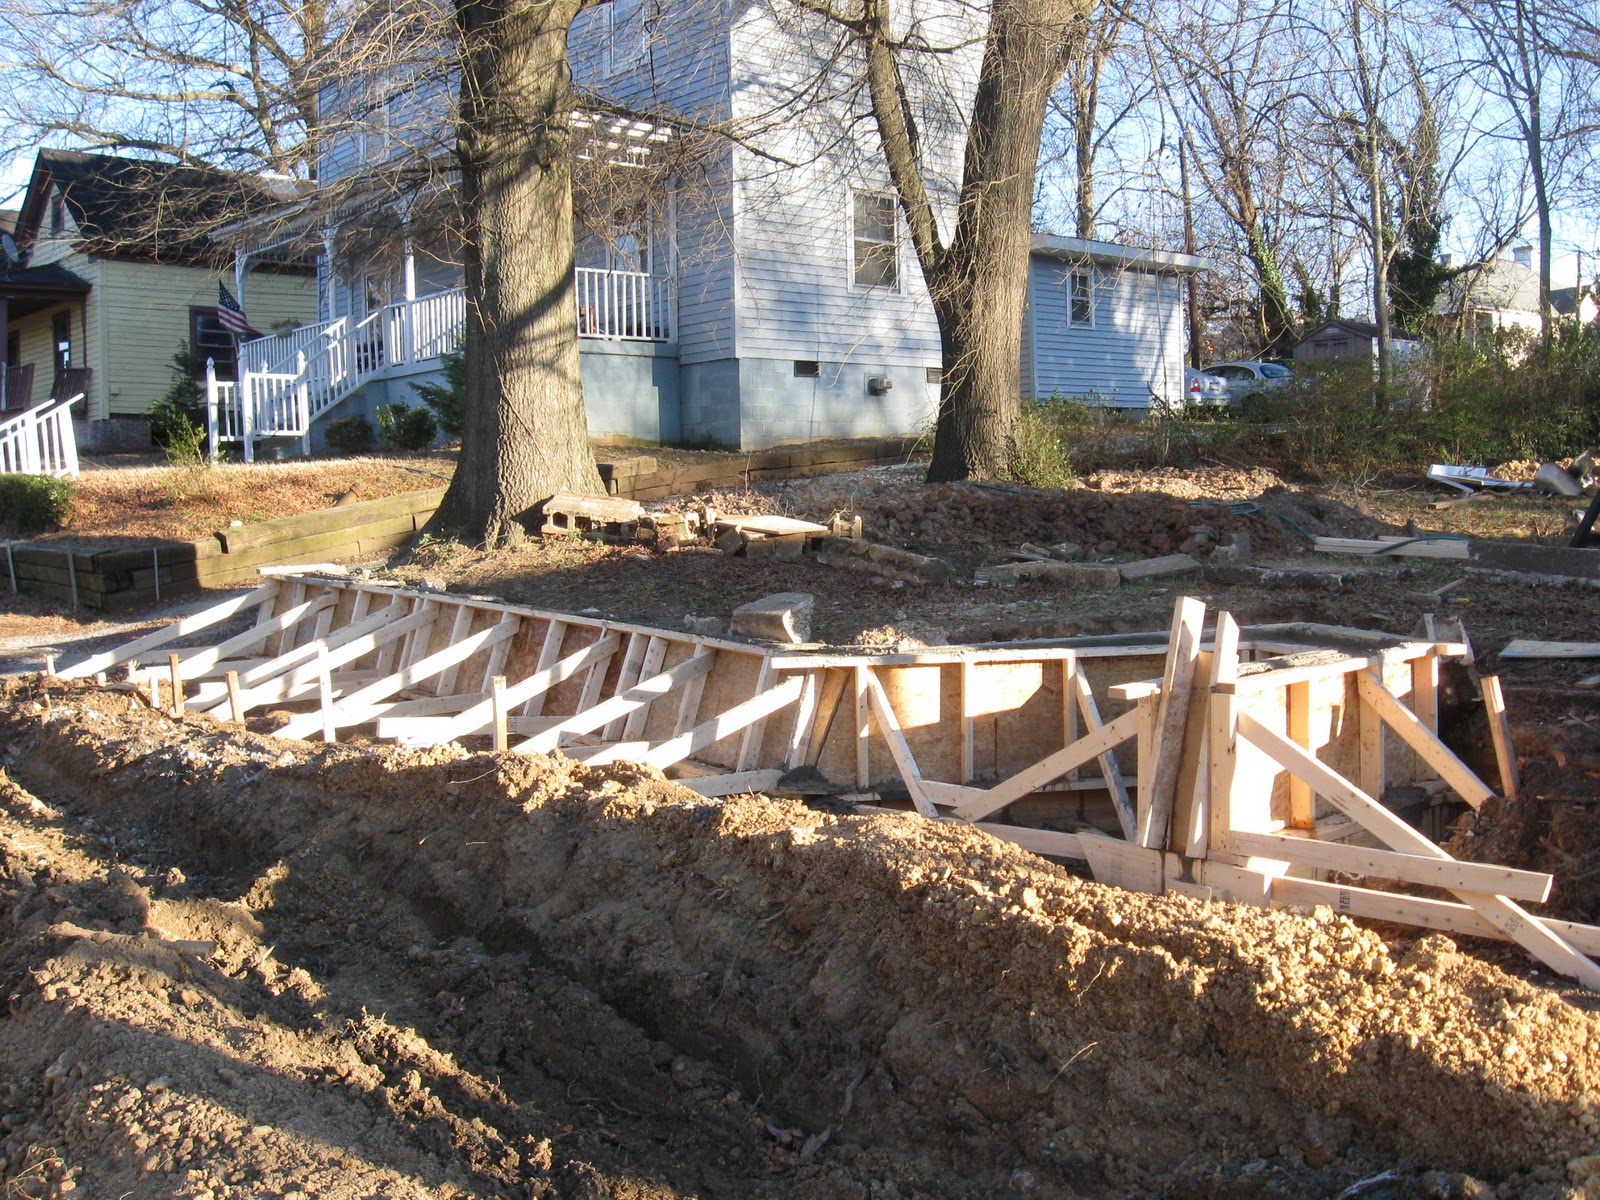
Below is the footing form that Jeremy and I made for holding the poured concrete. The footing is essentially a thick, wide, concrete perimeter that will hold the weight of the house.


Because the ground is sloped, I designed the concrete footing to have two levels (like a terrace, or step). Here is the part of the form where the one level transitions into the other:


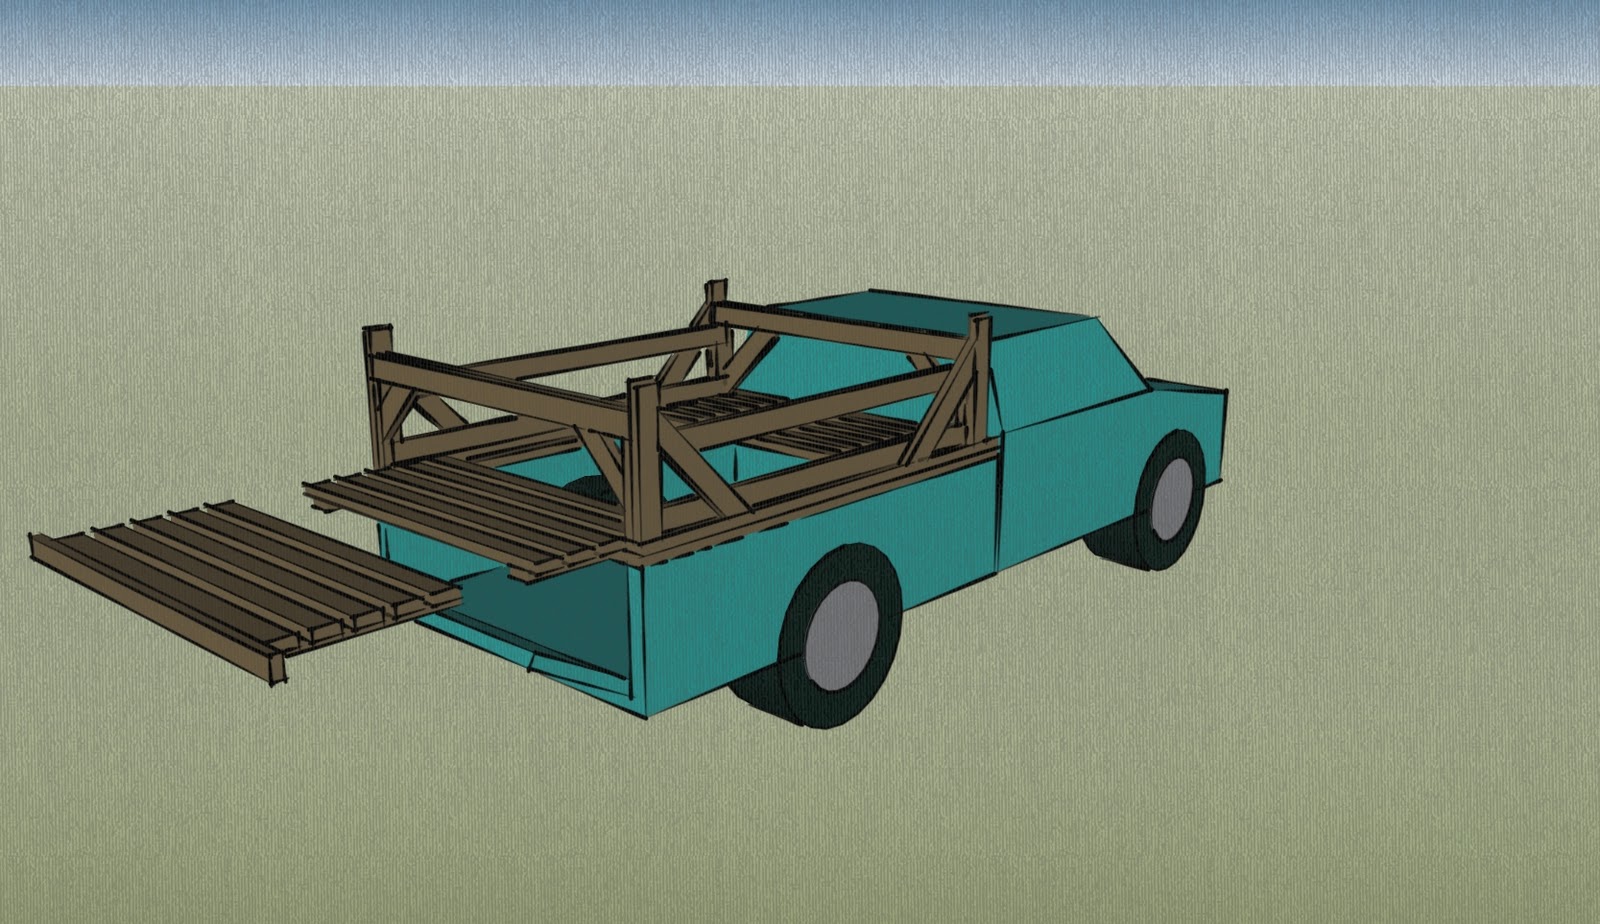
I got one load of gravel in my little truck, and then decided that it would be a ridiculous waste of time and gas to drive back and forth to bring the additional loads that I needed. So I ordered a big truck to come dump a big pile of it for me to conveniently take from. The gravel will be used for drainage purposes - underneath the footing, beside the footing, around the retaining wall out near the sidewalk, and so on. Whereas clay expands and seals itself off when it gets wet, gravel creates a whole community of little negative spaces through which water can drain and safely leave the underbelly of a building.


As the house footing project was beginning, I simultaneously decided to take down the retaining wall in the front of the lot (as it was old, poorly crafted, and falling over). I was able to push over all of it just using human power and a 5-foot, steel dig bar. You can see the remains of it up on the lawn.


After knocking down the old, it was time to make space for the new. This was another couple days (and nights) of digging.


This past Tuesday, Jeremy and I began building the form for the retaining wall. Every single retaining wall in this neighborhood was built vertically (and are all seemingly about to fall over any minute), so I decided to design the wall so that it tilted back against the earth at a 15-degree angle. Think about how much easier it would be to push over a wall that's standing in a vertical position, versus trying to push over a wall that's leaning against you. In the first scenario, you just have to tip it enough to let gravity take over. In the latter, you have to overcome gravity just to get it to vertical, and only then will you be able to heave it over. This is the challenge that I am setting for the earth behind the wall.


I continued working on these forms through the week...


It is important to get all of the details very tight and clean, so that I can eventually get the forms back off after the concrete is poured (and reuse the wood). If they aren't built meticulously enough, then concrete can seep out and entomb the wood for all of time with its gray, cold grasp.


Dylan volunteering some form work, in his I'm-going-to-the-moon jacket. The trapezoidal shape of the form around which he is working will be the space in which I will build stairs (probably concrete with brick steps):


The form is ready for concrete (finished the morning of the pour - phew!):


The night before the pour, Dylan and I again got out the worklight, ordered pizza (and beer this time), and set up for a long night of gravel-dumping and rebar-setting. I never ended up getting a great photo of our work, but here is one that my brother-in-law, Doug, took the following day of both Ian and the rebar (the rebar is the steel rod sticking up out of the gravel - it acts like a skeleton inside the concrete, so that if the concrete breaks or shifts with the earth, it still holds together).


My future digging partner in action!


The truck has arrived. It's quite a logistical nightmare to figure out how to pour. It's especially stressful because of timing. The truck can only stay for so long (so that the concrete doesn't set up inside of it). The chute can only reach so far. The truck can only back up so far. And so on...


On the afternoon of the pour, I had more help from Dylan, and also had my friend Danielle out (she's the builder of the two-story cob house that I have featured photos of before), and also my nephew! Doug generously offered to pick up Ian from school to take him on a personal field trip to see the pour. He's a big fan of heavy machinery - diggers, trucks, you name it. Below, Dylan and Danielle are pulling the concrete through the form.


For the second tier of the pad (which the chute couldn't reach), Dylan and I devised a wheelbarrow plan, involving two wheelbarrows and a precarious ramp.

First, the truck would fill the barrow.


Second, the driver would lift the chute (and stop the flow of concrete), and I (or Dylan) would begin pushing the barrow underneath the chute (through a shower of concrete droppings), and up the ramp. By the end of the pour, my hat was covered in concrete, as was my left arm, my shoes, and my whole backside.


 And thirdly, we would strategically pour the material out wherever it needed to go (or, in some particularly stressful instances, we would tip the barrow and spill the concrete all over the pad where we didn't want it - you can see one of my spill spots in the photo below, to the left of me).


For the retaining wall pour, I adjusted the chute to the right length and angle, and then the driver was able to slowly drive the truck along the road and pour as he went. Danielle held a sheet of plywood across from the chute the whole way, to re-direct any escaping concrete down into the form (like a really stressful game, almost).


9 yards of concrete later, and the pour is complete!


Today I began to remove the forms, which was very much akin to the feeling of opening christmas presents when I was seven. Tiana, below, is one of the neighborhood kids who have been consistently interested in visiting the site to check on the progress of things.


And the footing after the form has been entirely removed. I was really pleased with how the pour went, despite how rough a start we had (for any number of reasons). I will admit that it was probably the most overwhelming building experience I've ever had (aside from certain teaching experiences), but was very satisfying to get mostly right.


Tomorrow I'm excited to remove the form from the retaining wall!